
Easy Cheesecake Balls Recipe (No Bake & Delicious!)
Introduction
Imagine biting into a creamy, melt-in-your-mouth dessert that combines the rich indulgence of cheesecake with the fun, poppable size of a truffle. That’s exactly what these cheesecake balls deliver! These little bites of heaven are the perfect balance of sweet, tangy, and utterly irresistible.
| Why Cheesecake Balls Are Perfect | The Benefits |
|---|---|
| No oven required | Beat the heat and save energy |
| Make-ahead friendly | Prepare days before your event |
| Customizable | Endless flavor combinations |
| Portion-controlled | Perfect single-serving dessert |
| Kid-friendly | Fun to make and eat |
| Elegant presentation | Impress with minimal effort |
The best part? This easy cheesecake recipe requires absolutely no baking! With just a handful of ingredients and simple steps, you can whip up these crowd-pleasing treats for your next gathering. Whether you’re hosting a dinner party, looking for a quick dessert fix, or need impressive party dessert ideas that won’t keep you in the kitchen all day, these cheesecake balls are your answer.
Ready to discover your new favorite go-to dessert? Let’s dive in!
Table of Contents
Why You’ll Love This Cheesecake Ball Recipe
There are countless reasons why this cheesecake ball recipe deserves a permanent spot in your dessert rotation:
- Simplicity at its finest: Even novice bakers can master these no-bake treats with minimal effort
- Versatility galore: Customize with different coatings, mix-ins, and flavor combinations
- Make-ahead friendly: Prepare them days in advance for stress-free entertaining
- Kid-approved: Little ones love both making and eating these bite-sized delights
- Portable perfection: Easily transport to potlucks, picnics, and parties
- No oven needed: Ideal for hot summer days or when your oven is occupied
These cheesecake balls aren’t just dessert – they’re fun dessert ideas that double as an activity. Get the family involved in rolling and decorating for quality time in the kitchen! Plus, they’re among the most versatile easy desserts for parties since they can be customized to match any theme or occasion.
Ingredients Needed for Cheesecake Balls
What You Need to Make Cheesecake Balls
| Base Ingredients | Amount | Notes |
|---|---|---|
| Cream cheese | 16 oz (2 blocks) | Softened to room temperature |
| Powdered sugar | 1/2 cup | Sifted for best results |
| Vanilla extract | 1 teaspoon | Pure vanilla recommended |
| Graham cracker crumbs | 2 cups | About 14 full crackers, crushed |
| Salt | 1/4 teaspoon | Enhances flavor |
| Coating Options | Preparation | Best Paired With |
|---|---|---|
| Chocolate chips (white, milk, dark) | Melted | Any flavor variation |
| Crushed graham crackers | Finely crushed | Classic and lemon flavors |
| Chopped nuts | Toasted for extra flavor | Chocolate and peanut butter variations |
| Sprinkles or colored sugar | Various colors for occasions | White chocolate coating |
| Shredded coconut | Toasted or untoasted | Tropical variations |
| Cocoa powder | Sifted | Chocolate cheesecake balls |
| Crushed Oreos | Finely crushed | Oreo or chocolate variations |
| Optional Mix-Ins (use 1/2 cup of any) | Flavor Profile |
|---|---|
| Mini chocolate chips | Sweet, chocolatey bursts |
| Crushed Oreo cookies | Rich, cookies and cream |
| Lemon or lime zest | Bright, citrusy freshness |
| Finely chopped dried fruits | Sweet-tart chewiness |
| Peanut butter chips | Nutty sweetness |
| Crushed toffee bits | Buttery, caramel notes |
Equipment:
- Large mixing bowl
- Electric mixer (hand or stand)
- Cookie scoop or tablespoon
- Baking sheets lined with parchment paper
- Microwave-safe bowl (for melting chocolate)
Step-by-Step Instructions
How to Make Perfect Cheesecake Balls
| Step | Time Required | Tools Needed | Pro Tip |
|---|---|---|---|
| 1. Prep cream cheese | 3-5 minutes | Electric mixer | Room temperature cream cheese is essential |
| 2. Add sweetness | 2 minutes | Electric mixer | Sift powdered sugar to avoid lumps |
| 3. Mix in crumbs | 3 minutes | Spatula | Fold gently to maintain light texture |
| 4. Chill mixture | 2+ hours | Plastic wrap | Don’t rush this step! |
| 5. Shape balls | 15 minutes | Cookie scoop | Wash hands in cold water before rolling |
| 6. Chill again | 30+ minutes | Baking sheet | Firmer balls = easier coating |
| 7. Prepare coatings | 5 minutes | Small bowls | Use shallow bowls for easy rolling |
| 8. Coat balls | 15 minutes | Fork or toothpick | Quick, gentle motions for chocolate dipping |
| 9. Final chill | 1 hour | – | Allow full set time for best results |
- Prep the cream cheese: In a large bowl, beat the softened cream cheese with an electric mixer until smooth and fluffy, about 2-3 minutes. Scrape down the sides of the bowl as needed.
- Add sweetness: Add the powdered sugar and vanilla extract to the cream cheese. Beat until completely incorporated and smooth.
- Mix in the crumbs: Gradually add the graham cracker crumbs and salt to the cream cheese mixture, stirring until everything is well combined. If using any mix-ins, fold them in now.
- Chill the mixture: Cover the bowl with plastic wrap and refrigerate for at least 2 hours, or until firm enough to handle. This makes rolling much easier.
- Shape the balls: Using a cookie scoop or tablespoon, portion out the mixture and roll between your palms to form balls about 1-inch in diameter. Place on a parchment-lined baking sheet.
- Chill again: Return the shaped balls to the refrigerator for at least 30 minutes to firm up before coating.
- Prepare coatings: If using melted chocolate, melt chocolate chips in the microwave in 30-second intervals, stirring between each, until smooth. Place other coating options like nuts or sprinkles in separate shallow bowls.
- Coat the balls: Roll each chilled cheesecake ball in your desired coating, ensuring it’s completely covered. For chocolate coating, use a fork to dip the ball, allowing excess chocolate to drip off before returning to the parchment paper.
- Final chill: Refrigerate the coated cheesecake balls for at least 1 hour before serving to allow the coatings to set.
TIP BOX: How to make cheesecake balls without cracking
To prevent your cheesecake balls from cracking, make sure all ingredients are at room temperature before mixing. When shaping, don’t overwork the mixture—roll gently between your palms just until smooth. If the mixture becomes too soft while rolling, return it to the refrigerator for 15-20 minutes to firm up again. For chocolate-coated balls, ensure the cheesecake centers are thoroughly chilled before dipping.
ads 1
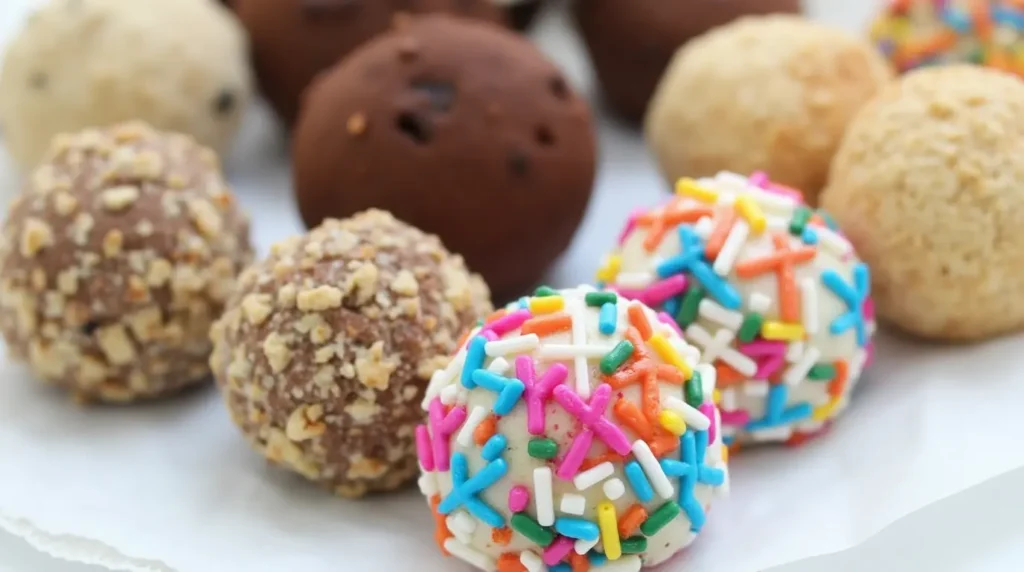
Flavor Variations
Take your cheesecake balls to the next level with these irresistible variations:
| Flavor Variation | Special Ingredients to Add | Recommended Coating | Prep Time | Difficulty |
|---|---|---|---|---|
| Chocolate-Coated | Base recipe | Dark, milk, or white chocolate with contrasting drizzle | 35 min | Easy |
| No Bake Oreo | Replace half graham crackers with crushed Oreos | Crushed Oreos or white chocolate with cookie crumbs | 35 min | Easy |
| Strawberry | 3 Tbsp strawberry preserves + 1/4 cup freeze-dried strawberries | White chocolate with pink sprinkles | 40 min | Medium |
| Peanut Butter | 1/3 cup creamy peanut butter | Chopped peanuts or milk chocolate | 35 min | Easy |
| Lemon Blueberry | 1 Tbsp lemon zest + 1/2 cup dried blueberries | White chocolate with lemon zest | 40 min | Medium |
| Chocolate Truffle | 1/4 cup cocoa powder | Chocolate sprinkles or cocoa powder | 35 min | Easy |
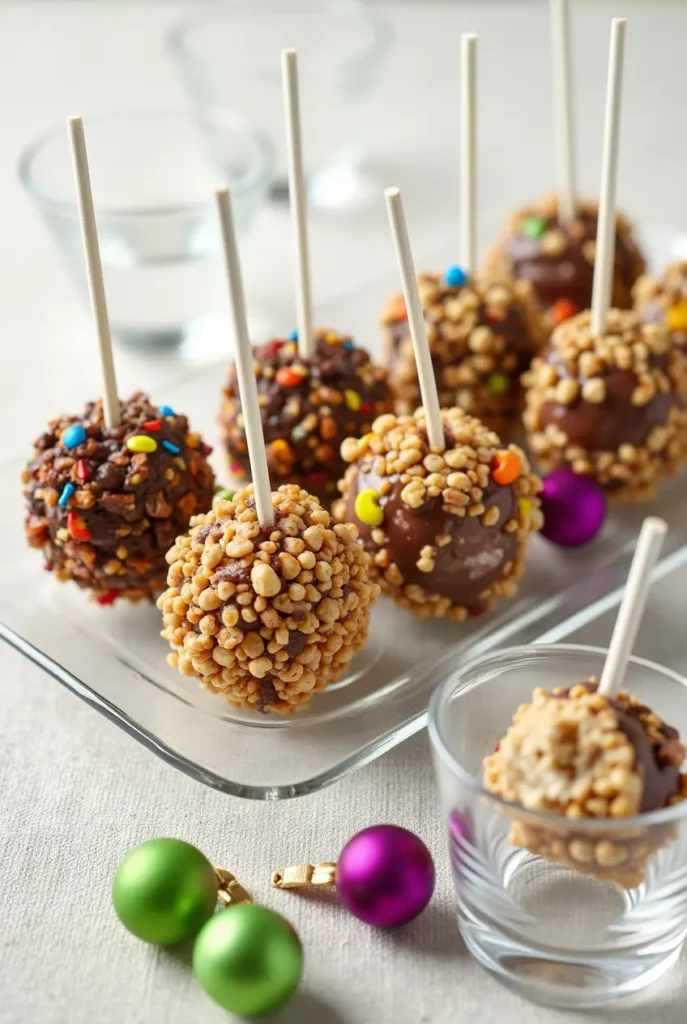
Chocolate-Coated Cheesecake Balls
Dip chilled cheesecake balls in melted dark, milk, or white chocolate for a glossy finish and rich taste. Add a drizzle of contrasting chocolate on top for an elegant touch.
No Bake Oreo Cheesecake Balls
Replace half the graham crackers with crushed Oreo cookies (cream included) in your base mixture. Roll in crushed Oreos or dip in white chocolate and sprinkle with cookie crumbs.
Strawberry Cheesecake Truffles
Add 3 tablespoons of strawberry preserves and 1/4 cup freeze-dried strawberries (crushed) to your base mixture. Coat with white chocolate and pink sprinkles for a pretty-in-pink dessert.
Peanut Butter Cheesecake Balls
Mix 1/3 cup creamy peanut butter into your base. Roll in chopped peanuts or dip in milk chocolate for a combination reminiscent of peanut butter cups.
Lemon Blueberry Cheesecake Balls
Add 1 tablespoon lemon zest and 1/2 cup dried blueberries to your mixture. Coat with white chocolate and sprinkle with additional lemon zest for bright, fresh flavor.
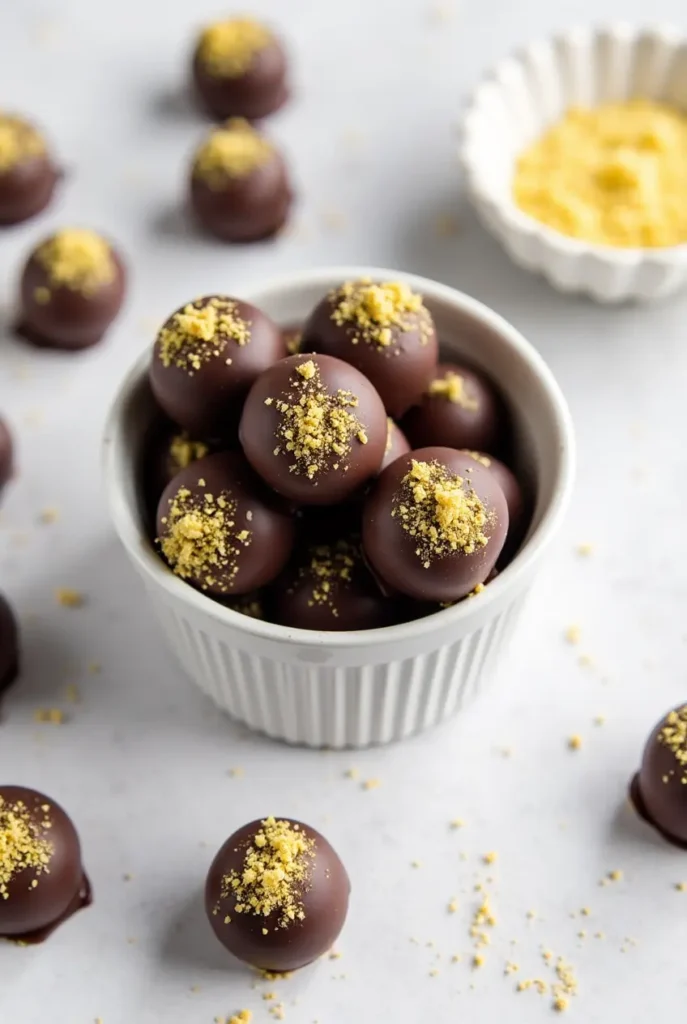
Chocolate Cheesecake Truffles
Add 1/4 cup cocoa powder to your base mixture for chocolate cheesecake centers. Coat with chocolate sprinkles or cocoa powder for double chocolate delight.
Expert Tips for Success
Perfect Texture Tips
- Make sure your cream cheese is fully softened to avoid lumps
- Beat the cream cheese alone first before adding other ingredients
- Chill the mixture adequately between steps—patience yields better results
- Use a cookie scoop for uniform sizing
- Slightly damp hands make rolling the balls much easier
Storage Solutions
- Store in an airtight container with parchment between layers
- For chocolate-coated balls, allow the chocolate to fully set before stacking
- Bring to cool room temperature for 10-15 minutes before serving for best flavor
Common Mistakes to Avoid
- Too much sugar: Follow the measurements—too much sugar makes the mixture too soft
- Warm ingredients: Always work with chilled mixture for easy handling
- Rushing the process: Each chilling step is essential for success
- Coating too early: Make sure the balls are firm before attempting to coat them
- Using cold cream cheese: This creates lumps that never fully incorporate
FAQs About Cheesecake Balls
| Question | Answer | Expert Notes |
|---|---|---|
| Can I make cheesecake balls ahead of time? | Yes, up to 3 days in advance | Flavors improve after 24 hours |
| Do cheesecake balls need to be refrigerated? | Yes, due to cream cheese content | Max 2 hours at room temperature |
| Can I use low-fat cream cheese? | Yes, Neufchâtel works (not fat-free) | Texture may be slightly softer |
| Can cheesecake balls be frozen? | Yes, up to 3 months | Freeze uncoated for best results |
| Why are my cheesecake balls too soft? | Mixture too warm or too much liquid | Add more graham cracker crumbs |
| Can I use vanilla wafers instead of graham crackers? | Yes, also digestive biscuits or gingersnaps | Adjust sweetness accordingly |
| Are these gluten-free? | Not with regular graham crackers | Use gluten-free cookies instead |
| How many calories per ball? | Approximately 145 calories | Varies with coating choices |
Can I make cheesecake balls ahead of time?
Absolutely! Cheesecake balls can be made up to 3 days in advance and stored in the refrigerator. In fact, the flavors often develop and improve after the first day.
Do cheesecake balls need to be refrigerated?
Yes, since they contain cream cheese, they must be refrigerated. Don’t leave them at room temperature for more than 2 hours for food safety.
Can I use low-fat cream cheese?
While full-fat cream cheese provides the best texture and flavor, you can use Neufchâtel (1/3 less fat) cream cheese as a compromise. Avoid fat-free versions as they won’t set properly.
Can cheesecake balls be frozen?
Yes! Freeze them on a baking sheet until solid, then transfer to an airtight container. They’ll keep for up to 3 months. Thaw overnight in the refrigerator before serving.
Why are my cheesecake balls too soft?
Your mixture might be too warm or you may have added too much liquid. Chill the mixture longer or add a few more graham cracker crumbs to firm it up.
Can I use vanilla wafers instead of graham crackers?
Definitely! Vanilla wafers, digestive biscuits, or even gingersnaps make excellent substitutes for graham crackers in this recipe.
Serving Suggestions
Elevate your cheesecake ball presentation with these serving ideas:
- Create a dessert charcuterie board with various flavors of cheesecake balls as the centerpiece
- Serve on small skewers or decorative toothpicks for elegant party presentation
- Place in mini cupcake liners for mess-free finger food
- Arrange on a tiered stand for a stunning dessert table display
- Pair with fresh berries and mint leaves for a pop of color
- Serve alongside coffee, tea, or dessert wine for a sophisticated finish
These mini desserts for parties are perfect for:
- Holiday gatherings (customize coatings to match seasonal colors)
- Baby or bridal showers
- Birthday celebrations
- Office potlucks
- Family movie nights
- After-school treats
Storage & Shelf Life
| Storage Method | Maximum Time | Best For | Special Instructions |
|---|---|---|---|
| Room temperature | 2 hours | Serving at parties | Not recommended for longer periods |
| Refrigerator (uncoated) | 5 days | Make-ahead prep | Store in airtight container |
| Refrigerator (coated) | 3-4 days | Ready-to-serve treats | Use parchment between layers |
| Freezer (uncoated) | 3 months | Long-term storage | Freeze individually first |
| Freezer (coated) | 2 months | Emergency desserts | Thaw in refrigerator only |
Refrigerator Storage
Store your cheesecake balls in an airtight container in the refrigerator, with parchment paper between layers to prevent sticking. They’ll maintain optimal freshness for up to 5 days, though the texture is best within the first 3 days.
Freezer Instructions
For longer storage:
- Place shaped, uncoated cheesecake balls on a parchment-lined baking sheet
- Freeze until solid (about 2 hours)
- Transfer to a freezer-safe container or zip-top bag
- Label with the date and freeze for up to 3 months
- Thaw overnight in the refrigerator before coating and serving
Best Containers for Storage
Glass containers with tight-fitting lids work best for refrigerator storage as they prevent odors from other foods affecting your dessert. For freezing, use freezer-safe containers or heavy-duty freezer bags with the air pressed out.
| Container Type | Best For | Advantages | Disadvantages |
|---|---|---|---|
| Glass with lid | Refrigeration | Prevents odor transfer, visible contents | Heavier, breakable |
| Plastic containers | Short-term refrigeration | Lightweight, stackable | May absorb odors over time |
| Freezer bags | Freezer storage | Space-efficient, moldable | Less protection from crushing |
| Metal tins | Gift-giving | Attractive presentation | Not see-through |
Printable Recipe Card
Easy No-Bake Cheesecake Balls
Prep Time: 30 minutes | Chill Time: 3 hours | Total Time: 3 hours 30 minutes Servings: 24 balls
Ingredients
- 16 oz cream cheese, softened
- 1/2 cup powdered sugar
- 1 tsp vanilla extract
- 2 cups graham cracker crumbs
- 1/4 tsp salt
- Coatings of choice (chocolate, nuts, sprinkles, etc.)
Instructions
- Beat cream cheese until smooth. Add sugar and vanilla; mix well.
- Stir in graham cracker crumbs and salt until combined.
- Chill mixture for 2 hours.
- Form into 1-inch balls and chill for 30 minutes.
- Roll in desired coatings or dip in melted chocolate.
- Refrigerate for 1 hour before serving.
Notes
Store in the refrigerator for up to 5 days or freeze for up to 3 months.
Related Recipes You’ll Love
If you enjoyed these cheesecake balls, you’ll definitely want to try these other delicious treats:
- Mini No-Bake Cheesecakes in Jars – All the flavor of cheesecake in adorable individual portions
- Chocolate Truffle Cookies – For the serious chocolate lover in your life
- Strawberry Cheesecake Dip – A party favorite ready in just 10 minutes
- Oreo Cheesecake Bites – The perfect combination of cookies and cream
- Raspberry White Chocolate Dessert Bars – Sweet, tart, and irresistible
- No-Bake Cookie Dough Truffles – Safe-to-eat cookie dough in bite-sized form
These cheesecake recipes and dessert ball recipes make excellent additions to your repertoire of sweet snack ideas. Each one is tested and perfected for your baking success!
Final Thoughts
There’s something truly magical about these no-bake cheesecake balls. Perhaps it’s how they transform simple ingredients into something so special, or maybe it’s the way they bring smiles to everyone who tries them. Whatever the reason, they’ve become my go-to recipe when I need a foolproof dessert that impresses without stress.
I’d love to hear how your cheesecake balls turn out! Did you try one of the variations? Create your own flavor combination? Let me know in the comments below!
If you make this recipe, please consider leaving a rating and review. Your feedback helps other readers find recipes they’ll love.
And don’t forget to snap a photo of your beautiful creation and share it on Facebook or Instagram with the hashtag #mycheesecakeballcreation – I’d love to see what you make!
Happy no-baking!